
The tricky part of making a darkroom is not darkening it but ventilating it. After all, now its windows and doors are sealed. So we’ll address ventilation first.
Silencing a room is even trickier. But we have a couple aces up our sleeve for that.
We need to understand how ventilation works so we can design a good system. Ventilation affects both the silence and temperature of a darkroom. We will examine each of these conditions, then see how they work together in a mechanical system. Then we will make the components of the system.
Numerals with - x + are in millimeters (see metric).
ventilation
This section is on ventilation in general. I will give design constraints and describe various systems. But first, I will address its physiological importance.
breathe
Nature gives us a constant, abundant supply of fresh air. So must our buildings.
I have observed a shocking number of people who seem oblivious to their own needs for fresh air. Everyone knows we die within minutes without air. Yet the importance of a continuous fresh supply of it has escaped many.
I can only attribute this negligence to mass psychosis. It is my stock explanation for the appalling features of civilized life. The need for fresh air is one of the most basic, most obvious facts of life. At the risk of insulting your intelligence, I am bound to address it.
Fresh air is always important. It is a normal condition of life. Along with warmth and safety, it is one of our most urgent necessities. Every second of our lives, quintillions of organic processes occur. Virtually all of them require oxygen. It is the most important nutrient we consume. We can live without food for weeks, and without water for days. But without air, we are gone in minutes.
Just like food, air becomes a part of one’s organism. It affects quality of life to a very great degree. It seems like nothing. But the amount of air you breathe masses twice as much as the food you eat. In a darkroom, you have little to do besides breathe. If you haven’t paid attention to air quality, you will notice it in darkness.
Even if you don’t, poor air quality cancels most benefits of a retreat. Intermittently airing the room out does not work. I mean opening the door a couple times a day with eyes covered. Put this approach out of your mind. This is darkness, not the dark ages. Whatever it takes, no matter where you are or what you are doing, always provide yourself with continuous fresh air.
For a dark retreat, this means either:
- following the instructions below
- hiring an HVAC contractor to clean, repair, replace, or install ventilation in your home
- moving somewhere the ventilation system just works (like the tropics or a new house in northern Europe)
- using houseplants: high oxygen producers and air-purifiers
- or a combination of these
Somehow, it must be done. Forget darkness a moment. We rarely have a more urgent concern in life than arranging to breathe fresh air continuously and comfortably. Keeping it foremost in your thinking about darkroom design and construction will help ensure a successful retreat.
Not freezing to death and avoiding danger are more urgent than continuous fresh air. Building systems can meet all these needs harmoniously. Unaddressed fear and ignorance result in design conflicts between them. For example, we still often depend on windows for ventilation instead of a proper, separate system. The rest of this chapter will help you avoid such errors.
constraints
- system provides plenty of fresh air
- absolutely lightproof
- silent: absolutely no hum or harmonics from fan and exterior noises mostly extinguished
- comfortable temperature: no undesired cold drafts
- economical: ie, no wasted heat to the outdoors. This is more involved and a lower priority than retreating itself, so don’t get stuck on it. It requires a heat recovery ventilator (HRV). Besides significantly lowering heating costs, an HRV improves air quality and comfort in nearly all climates. More about it below.
system
Somehow, fresh air has to get into the darkroom and stale air has to get out, without letting in noise or light.
In the terms of the HVAC industry (Heating, Ventilation, Air Conditioning), the fresh air vent is the supply and the stale air vent is the return.
Sometimes, supply and return vents exist in the same room. This is the fanciest version of balanced mechanical ventilation. If your place has it, thank your lucky stars. Just make sure it runs continuously. Unless your room is huge, intermittent is not good enough.
More commonly, balanced systems put supplies in bedrooms and living rooms, and returns in kitchens and bathrooms. This means air escapes a bedroom around the door. Unless the space outside the door is totally dark, this calls for a threshold lightproof vent (plans below).
Balanced systems are rare. More common are negative pressure systems: bedroom and living room windows act as passive supplies and bathroom and kitchen exhaust fans as active returns. In this case, a lightproof universal vent, built into a window blind, is the supply. Or a silencer if noise surrounds your dwelling. A threshold vent is the return, letting stale air escape the bedroom to the exhaust fan.
Rooms with totally passive ventilation rely on open windows, exterior vents, and infiltration through cracks. These will get sealed against light. Such rooms will need universal vents in blinds at different heights to take advantage of convection. But they probably call for a fan and a silencer, maybe ducting.
By closely observing buildings I have discovered some simple ways to ventilate them. Sometimes rooms have lightproof and sound-dampened holes built into them in unexpected places:
- unused holes for pipes, wires, chimneys, and ventilation.
- behind a cupboard or piece of furniture, or inside a closet
- a removable panel or wide piece of trim that could be temporarily replaced with a panel with a hole in it.
Once, a new door exactly the same size as my darkroom’s door caught my eye. It was in the garbage at a building supply store because of cosmetic damage. We were buying other materials, so they let us take it. I stored the original door and cut supply and return holes in the salvaged door for ventilation.
Another darkroom had no ventilation or suitable holes anywhere. But it also had no door. So we built a frame inside the doorway with a narrow door on one side and a narrower panel on the other. We cut holes in the panel for ventilation ducts. We fixed the frame in the existing doorway with metal straps screwed into old hinge holes. When dismantling the darkroom, we left no trace.
Similarly, we hung 7m of ducting that ran through three rooms; attached a silencer to it; made three window panels; and covered five more windows in the building on the way to the bathroom—all with only one new screw hole in the entire rented house. And that hole was invisible behind a loose piece of trim. “Leave no trace” is a fun game that often improves design.
Sewage pipes drain downward but are ventilated upward. Once, friends and I replaced a flush toilet with a composting toilet. The exposed drain pipe, being oversize and in a single-story house, wasn’t subject to backflow. So it proved a perfect exhaust duct for a case fan at floor level. Imagination conquers all obstacles (and renews itself in darkness).
Separate ventilation from windows whenever possible. Give it its own holes in walls. This improves many attributes of a shelter: security, economy, comfort, silence, darkenability, and overall control.
vent
Here are further design constraints, photos, plans, and instructions for making and installing lightproof vents.
constraints
(universal / uv-short specifications in parentheses)
{threshold vent specifications in curly braces}
- durable (protected by cardboard shell){protected by wood reinforcement, subject to damage by kicking but easily rebuilt, could be made of sheet metal or shielded with cardboard or thin wooden boards}
- thin enough to fit between blind and window (<84-) or door and threshold {adjustable}
- cross-sectional area >78cm2 (85cm2){60–120cm2} to equal standard 100- diameter ducting
- fully blocks light, sending light around at least 5 corners (6 corners / 4 corners + enclosure’s corners){2–6 fabric-covered corners}
- short airway (465- / 312-){370-}
- minimal size (220 x 290 x 77 / 140 x 281 x 67){fits under door, sticks out 20- each side and up 60-}
- easy to make (medium){medium}
- elegant (yes: simple compact form, uses common materials){yes: adapts to nearly all swinging doors}
- cheap ($4 in materials, 2-hour assembly time){$2 in materials, 1-hour assembly time}
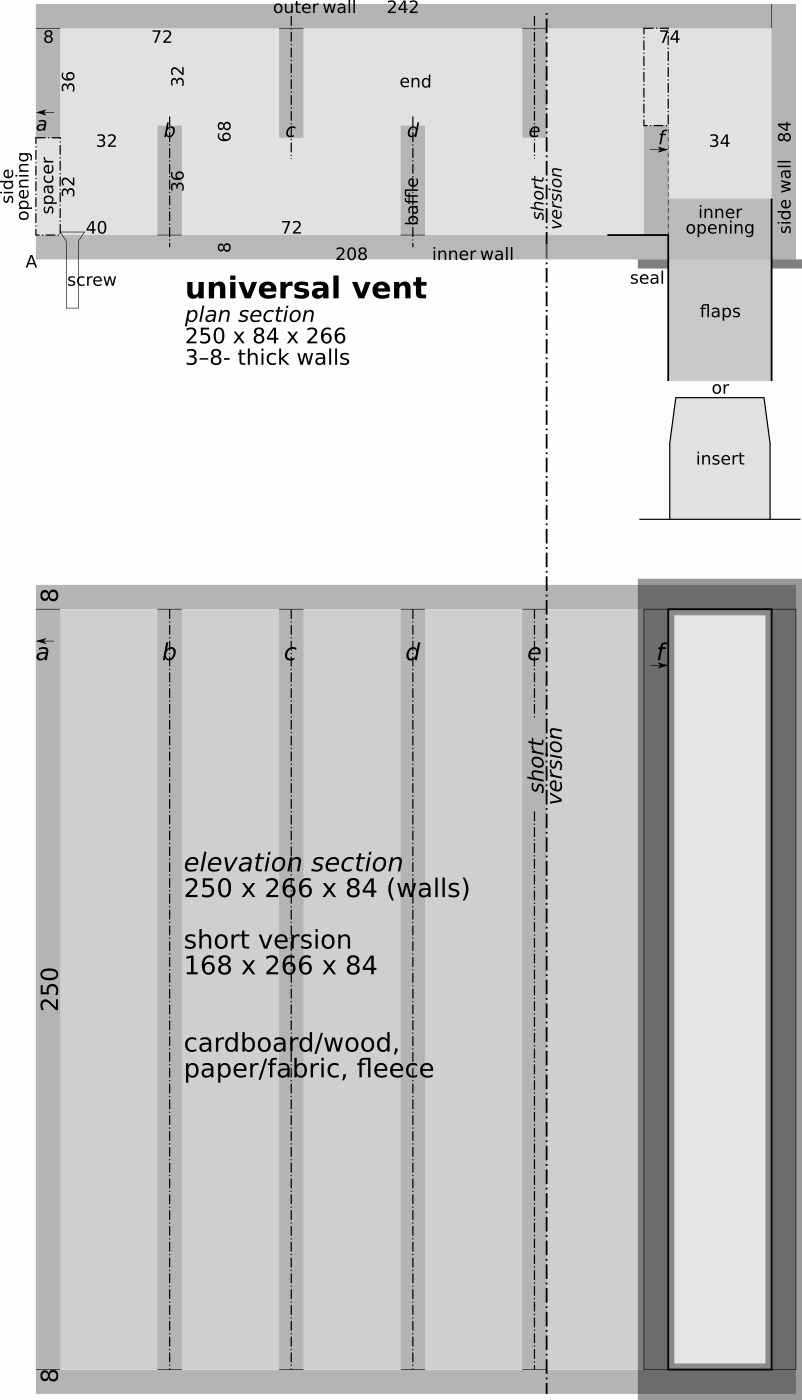
universal
The universal vent works nearly anywhere. It attaches by its face or side to a slot in any material. It can be made of cardboard or wood. Its principle adapts to any size. Walls and baffles can be thinner or thicker. It can be shortened for enclosure, eg, inside a silencer. All its rigid parts are rectangles, easily cut with a knife or table saw. It works for supply or return air.
The old helix vent is in the zip file. It requires no painting or sealing and less cutting and gluing. It is more intricate in its measurements, markings, cuts, and folds.
plan: universal vent - download
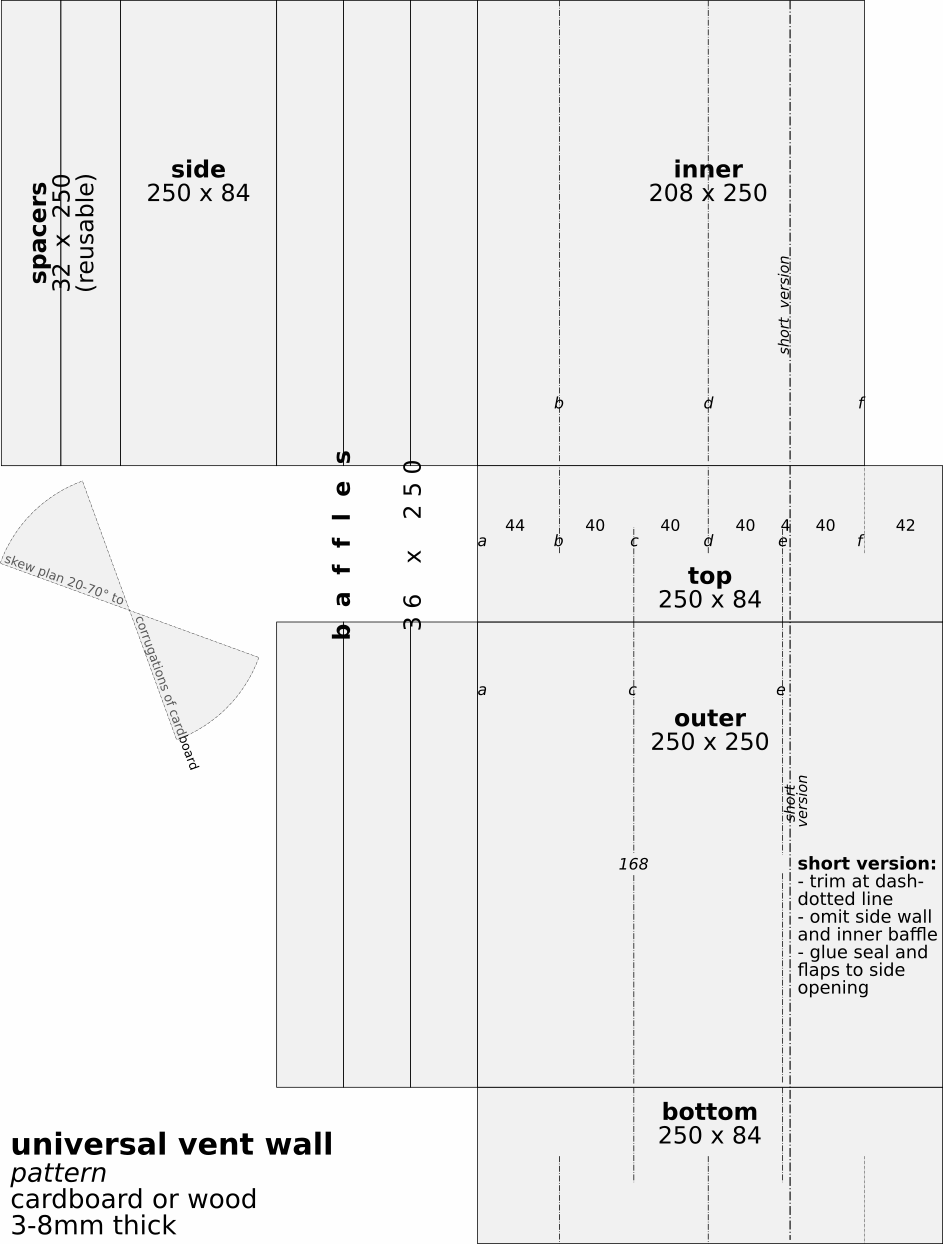
plan: universal vent, walls - download
plan: universal vent, parts - download
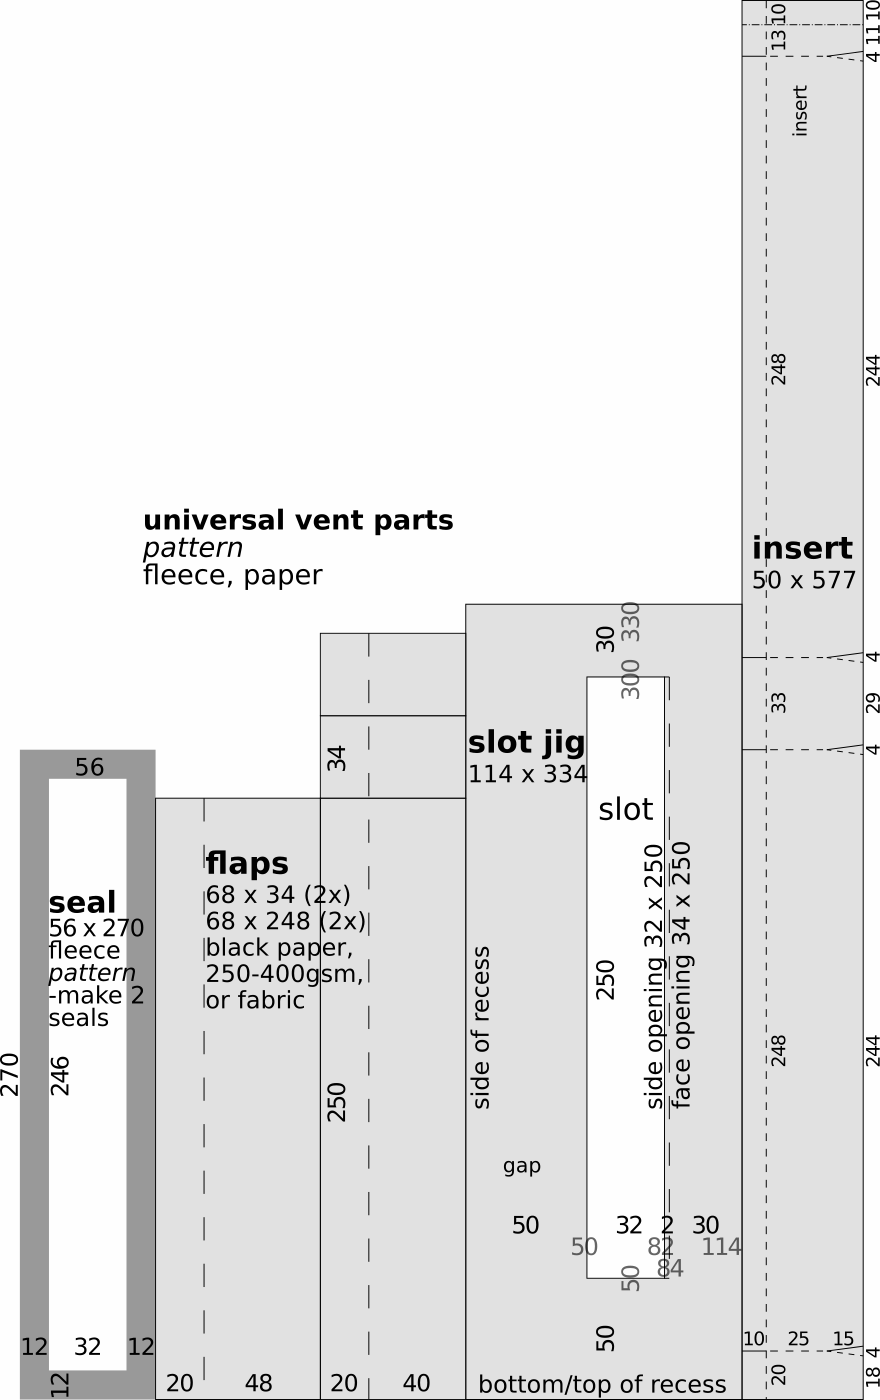
The universal vent can go anywhere: a blind, a door, a wall, etc. Flaps and seal attach to either opening. They poke through a slot and get taped or glued down. Mostly it attaches to a blind with the face opening.
- blind: attach it to a blind and slightly open the window behind it.
- door: cut slot in it and use universal vent instead of a threshold vent.
- existing vent in a wall: cut a hole in a cardboard box the same size as existing vent hole. Cut a slot on the opposite side of the box for a universal vent. Attach universal vent to box and box to wall over existing vent.
- enclosure (like silencer): use shortened version inside or out. It has fewer light-stopping corners because enclosure already has two or more. Attaches at side wall. See note in drawing and dash-dotted lines and measurements.
If your darkroom’s ventilation is passive, put vents both low and high in room to enable convection. This works better the greater the inside and outside temperature difference; the greater the vertical distance between vents; and the more vents.
For manufacturing: a set of simple wooden or sheet metal templates and jigs, maybe a table saw with a sled, can speed production tremendously while keeping equipment and investment to a minimum. Start in your garage.
Read through instructions once while studying plans.
prep
- materials:
- walls, 3–8- thick
- cardboard: double-layer is stable if kept dry and out of direct sun and intense heat.
- wood: thin tongue and groove boards, masonite, exterior plywood aged 3+ months, or marine plywood. Avoid interior plywood. Its especially toxic glue outgasses a long time.
- flaps: black acid-free posterboard/cardstock/coverstock, 250–400gsm or thin tightly woven fabric like poplin or twill
- seal: black polar fleece, medium weight. Quality check: a 10-layer stack should measure 30–35- high.
- tricot or no-see-um netting
- glue: school and wood
- acrylic paint, matte black. Or glue black paper to one side of cardboard and both sides of baffles. Do one or the other before cutting walls and baffles.
- walls, 3–8- thick
- follow instructions in fabricate
- determine exact vent location
- in blind, panel, or silencer
- whether it will attach at side or face opening
- vent must clear window handles, locks, and frame
- if used with a double blind, shade hole in insert from direct sunlight
- the plan adapts to wall material between 3–8- thick. Just move walls and baffles toward point A to accommodate it. Use these rules:
- keep inner wall flush with inner and left edges of end
- keep baffle a flush with left edge of end
- move outer wall inward
- keep inner and outer walls 68- apart (with spacers)
- keep baffle f flush with right edge of inner wall (thin dash-dotted line)
- keep baffles b, c, d, e centered on dash-dotted lines, shifting them downward (in short version, keep e flush with right edge of end and outer wall)
- keep side wall against outer wall
assemble
- seal: glue 2 seals together with minimum of school glue: a skinny bead around outer perimeter, with a little extra at the corners.
- inner half
- inner wall
- top end
- long folded flap, 1 short flap
- baffles b, d, f
- side wall
- 2 spacers. Attach a piece of tape around an edge so you can pull them out from the openings once vent is dry. Use only 2 dots of glue on each spacer for removability, just enough to hold them in place as you fit the halves together.
- outer half
- outer wall
- baffles a, c, e
- seal inside corners with black acrylic paint, fabric, or paper
- glue halves together
- inner half
- outer half
- bottom end
- add
- 3 other flaps
- seal
- Let it dry. Until installation, keep it in a dust-proof bag.
install
- mark slot with slot jig
- it spaces slot correctly on most blinds and panels. It can be further from corner but only 20- closer on panels.
- face opening, 35 x 248, on blinds, panels, or outside silencer, with shell
- side opening, 32 x 248, inside silencer or other enclosure, without shell
- cut out slot
- position vent over slot and fit vent flaps through it
- when attaching to soft material like fabric, plastic sheeting, or cardboard, pull long flap snug, use back of table knife tip to crease the outside of it right where it passes through slot
- fold flap at crease and tape it down. Tape makes vent removable. Only glue it in place if you are certain of not moving it for years.
- repeat with other long flap, then with short flaps
- secure side opening with screws. Screw through inner wall into panel or blocks. Or screw from other side into inner wall. If blind material is soft (plastic, fabric, paper, cardboard), use fender washers.
- vent must be shaded to minimize fading of black paper and warping. Usually, insert of double-blind or white material over window will do this. Otherwise, cover shell with white paper. If in direct sun, shade it somehow.
shorten
Shorten the vent for use inside a silencer or other enclosure. The enclosure must have two or more blackened corners that light must go around. Follow instructions in wall drawing. Note dash-dotted lines in plan and elevation views.
The short version is 168 x 266 x 84. If an even smaller vent is required:
- use thinner cardboard, 2–4-
- slide baffles leftward, maintaining 32- and 34- spacing
- trim protruding walls
- or shrink the design proportionally
- or use old helix-z vent (140 x 281 x 68 in the body), in zip file
With thought and experiment, every engineering problem can be solved. This is the awesome and terrifying power of technique: of physics and engineering. Let us use it to our advantage, for the purpose of coming back to life.
threshold
A bedroom door often has a gap under it, at the threshold, for ventilation. A threshold vent uses this gap to let air through but not light. The design adapts to door width, door thickness, and gap under the door. It also adapts to how much light is outside the door.
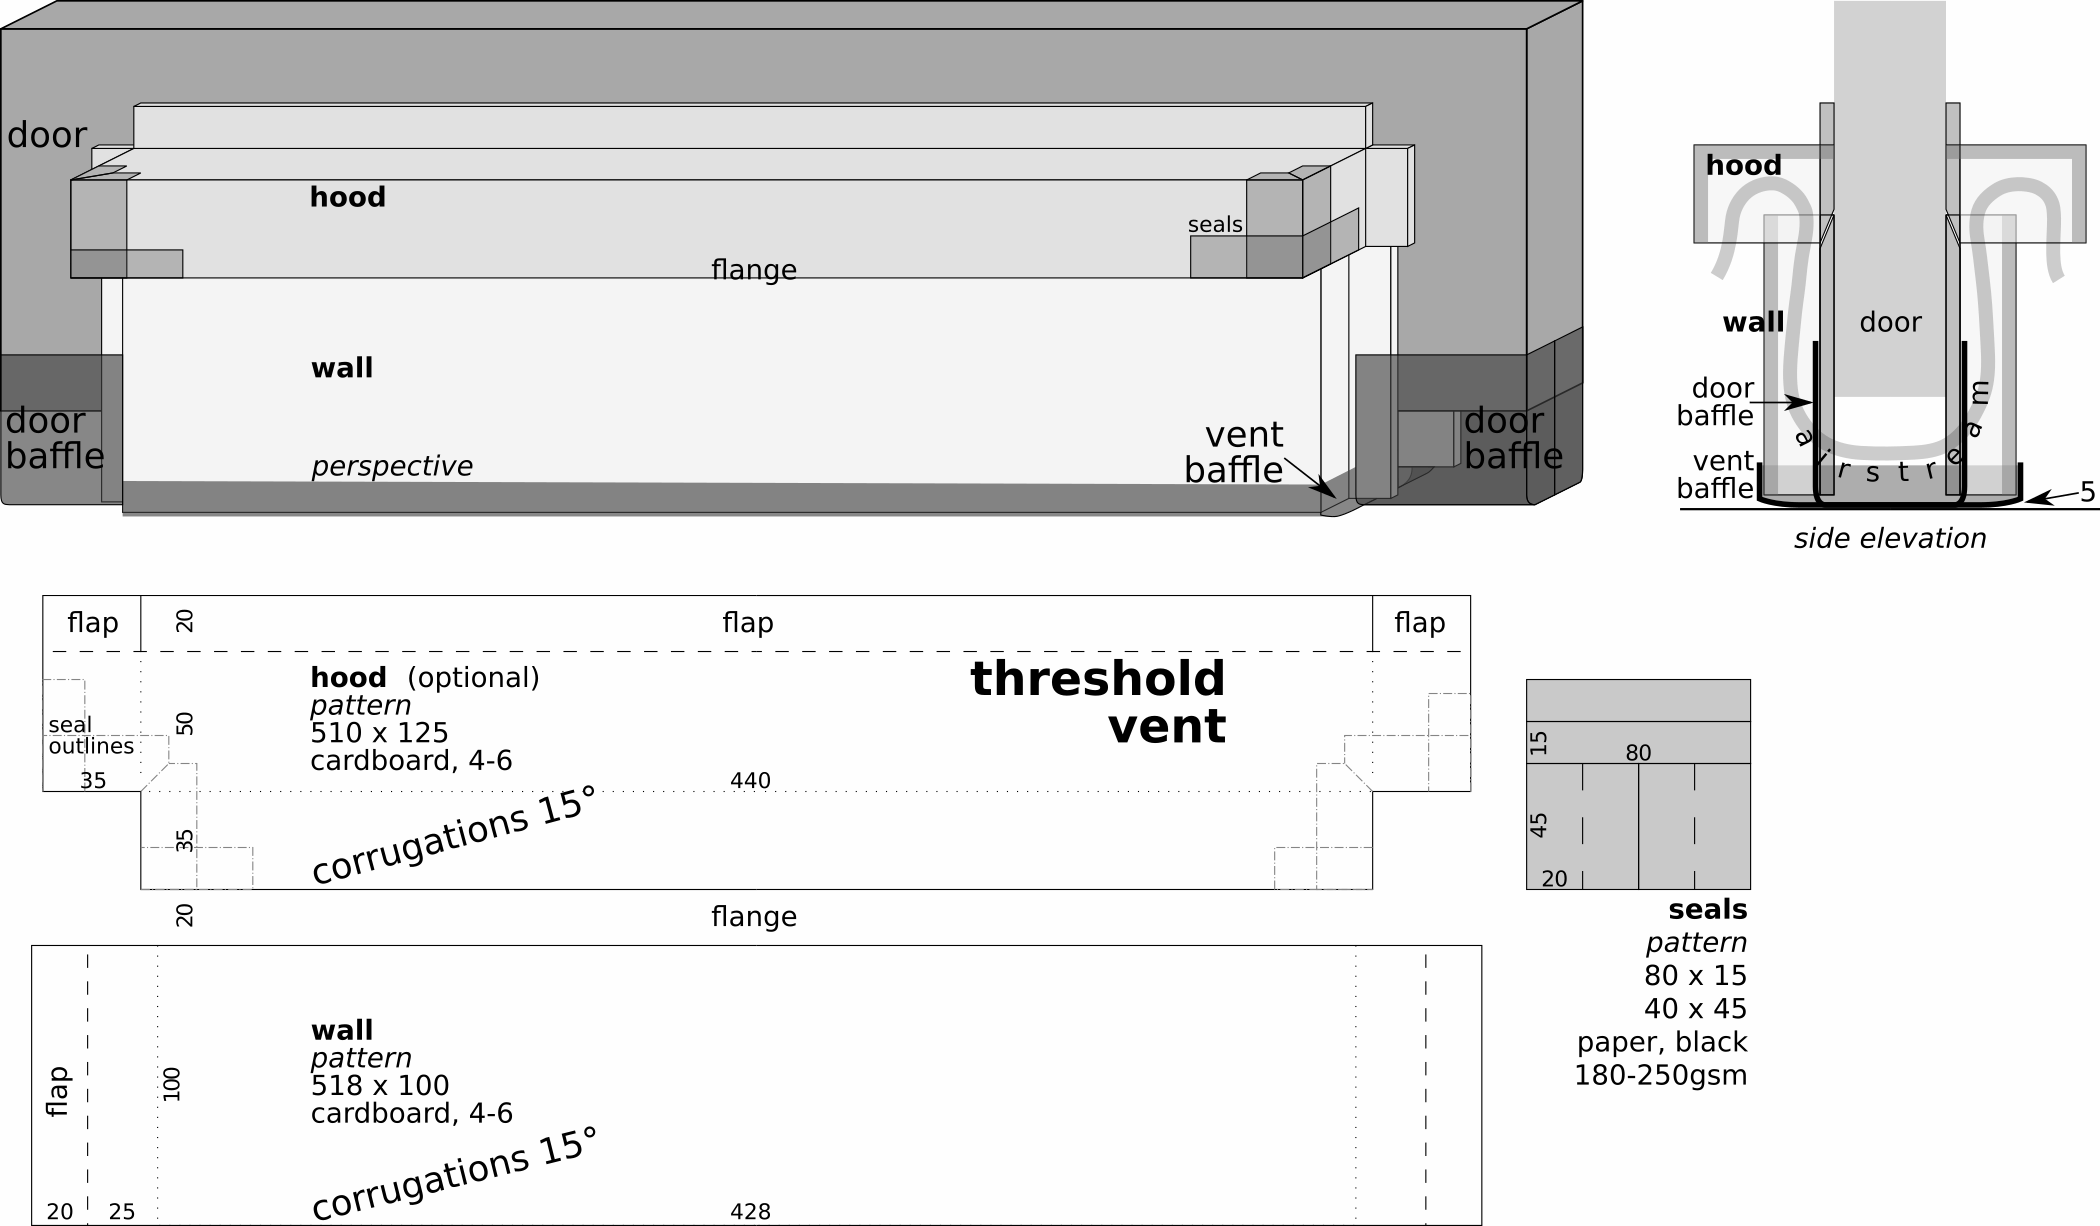
plan: threshold vent - download
If gap is greater than 40-, add wood to bottom of door; build up threshold with boards; or modify the design. If less than 13-, use black paper for the vent baffle instead of fleece, along with black paper over the threshold. If less than 6-, trim the bottom of the door or find another way to ventilate the room.
If the light outside the door is dim, just the vent walls are enough. If bright, use one or two hoods as well. You can add them later after testing.
Usually, you need to darken the area outside your door anyway. Either you need a path to a bathroom. Or your supporter needs to get in without lighting up your room. Cover windows in the hallway. Make a curtain across the hallway with a dark blanket fixed to the walls and ceiling with tape or tacks.
Or make a removable partition. It’s a wooden frame filled with black plastic sheeting. Fleece seals the frame. Ducting or universal vents can penetrate the sheeting. A little wider than the hallway, it wedges in place at a slight angle.
fabricate
- materials
- cardboard, double-wall, 4–6- thick (400 x 600 x 130 flat produce boxes are perfect)
- fleece, black, 200 x 1000
- muslin, black, 500 x 700
- cardstock (posterboard), black, acid-free, 180–300gsm, 550 x 700 for seals, maybe threshold.
- double-sided clear plastic tape or adhesive
- double-sided foam mounting tape or 3M Command strips
- prepare pattern with instructions in fabricate
- cardboard
- fold at creases a little past 90°
- edges of hood that fold into each other: crush to 45° so that edges of outer facing of cardboard meet
- glue the seals onto hood, long skinny ones first
- cut and glue muslin inside wall and hood pieces, except on flaps
install
- position one vent wall on door so that it is 5- above high point of floor in swing area of door. Tack in place with masking tape. Once it is perfect, mark its position with tape. Duplicate marks on the other side of the door.
- attach muslin over area of door that vent will cover. Width: 420-. Length: from 20- above wall on one side to same height on other, wrapped under the door. Use double-sided tape. Seal with finger nail. If no hood is needed, masking tape works, too. Use wall as guide or remove it and use tape marks. Remove wall afterward.
- vent baffle
- cut piece of fleece 470 x (90 + door thickness)
- glue to bottom of one wall
- glue extra length at sides up the sides of the walls. Cut slit where flaps are.
- attach vent walls to door at marks. Use double-sided foam tape or 3M Command strips.
- glue vent baffle to bottom of other wall
- measure and cut door baffles wide enough to seal door where there is no vent. Add 10 + half the door thickness. Length = (46 + door thickness). Attach them to door 20- above bottom of door. Use masking tape.
- if light leaks under the door, cover the threshold with black paper or fabric
- if there’s a danger of kicking it in, glue pieces of wood, 10 x 428 x 38, to the bottom of the walls. Screw them in from the inside with 3 x 15 screws and fender washers.
soundproofing
principles
At some point, noise defeats a retreat. One must attenuate it somehow, even in remote locations.
Shelter is the normal means of controlling exposure to pollution. Pollution includes noise.
Outside, noise comes from machines, traffic—including boats, trains, and airplanes—construction, music, fireworks, and talking and playing people. Inside, it comes from machines—refrigerators, fans, water pipes and pumps), people in adjoining spaces, and their music.
The four principles of soundproofing are:
- mass: use heavy materials absorb low-frequency (bass) sounds
- absorption: use fine fibers absorb high frequencies and prevent echoing
- dampening: use rubbery material dampens vibration in resonant materials like metal, wood, masonry, glass
- decoupling: disconnect structures and airspaces to prevent transmission of sound vibration between them
Soundproofing tutorials abound online.
These principles apply to ventilation as well. Dampening and decoupling figure in the fan mount; mass and absorption, in the silencer. The silencer absorbs most noise, including the fan’s.
Fans make noise directly and indirectly. Small fans have little hum to start with, but they run at high speed, so they develop harmonics. Bigger fans start with more of a hum but they run more slowly for the same air output, so they develop less noise overall. Use fan mount to avoid amplifying these vibrations.
Even the quietest fan makes noise because of the friction of air itself against the fan blades, housing, ducting, and vents. Because of air friction, fully silencing a ventilation system requires a silencer of some type at the room-ends of ducts.
silencer
A silencer is an larger duct section lined with insulation. Its greater volume depressurizes the airstream. This transforms low-frequency sound into into high-frequency sound. High-frequencies vibrate the fine fibers lining the silencer, transforming the sound into heat. Genius!
You can make or buy silencers.
- my double-turn box design is below, $2-$10 depending on your material salvaging skills.
- DIY straight tube
- for sound booths. With dark insulation and enough bends, this eliminates the need for a lightproof vent.
- manufactured silencers are made of metal and other super durable materials and cost $100–200.
- acoustic ducting, at least 3m of 100- with 2–3 bends
Silencers and acoustic ducting are standard industrial components, making buildings quiet worldwide. Thanks to Richard Nöjd of Skattungbyn, Sweden, for showing me these solutions.
I built silencers into window recesses on two occasions. They were simpler and more effective than I hoped. They swallowed up sound. The window, open at one end, provided one face of the box. The thick wall provided 4 sides. Boards against the inside of security bars formed the box’s outer face, about 20cm from the glass. Shredded fabric insulation lined the box. This technique disables the window as a light source. It is a temporary solution. It works if you have other windows you can uncover during transition days.
The design below is a zig-zag channel through insulation inside a wooden box with a hole at each end. Each hole has 4 possible locations: face, sides, or end. Cut a circle for ducting or fan, a slot for a universal vent. The fan mount adapts to all 4 locations, inside or out.
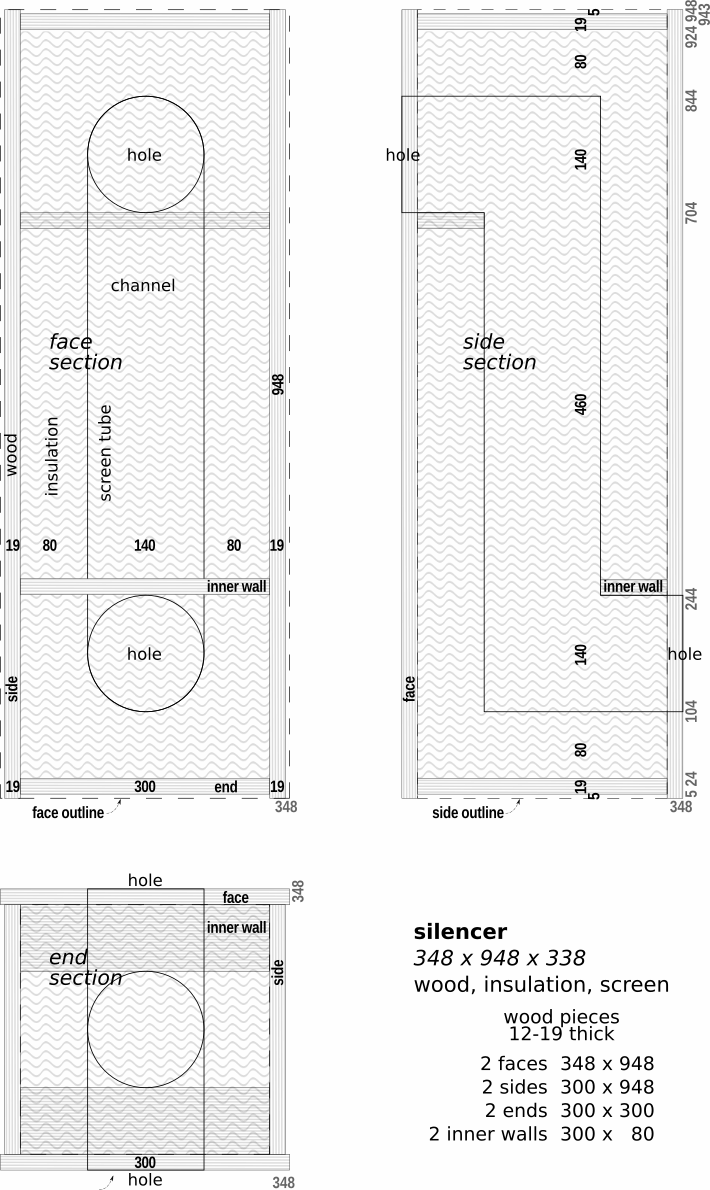
plan: silencer - download
The box is lined with porous non-toxic insulation. clean wool, shredded fabric, wood fiber could all work. Note, the shredded fabric and wood fiber I’ve tried had faint smells that I disliked.
Rockwool works. It is unpleasant to work with, but it is fairly odorless. Polyester pillow filling and quilt batting and acoustic foam work. But I don’t like my air going through plastic.
Fiberglass is terrible to work with and often smells of chemicals. Closed cell foam, like styrofoam, polyisocyanurate boards, camping pads, etc, does not work due to non-porosity.
Discarded furniture is made of melamine, an excellent material for silencer boxes. It is particle board with resin veneer, usually 15- or 19- thick. Marine plywood uses non-toxic glue. Otherwise, avoid plywood or line with foil or mylar.
Use a table saw to cut the 8 pieces so they come out square. Or have a carpenter do it for you, including the holes. Just take the drawing with you, modified for your needs. The carpenter probably has some extra melamine laying around to sell you cheap. To screw pieces together, first drill pilot holes so edges don’t break. I always drill pilot holes in wood less than 30- wide for this reason.
To insulate, make round tubes of plastic screen. Cover with porous fabric if insulation is fine, like cellulose. Stuff insulation around it and close the box. Roughen the plastic surface first with sandpaper so the glue sticks.
hum
People all over the world have reported hearing a strange hum. Its source is rarely found. In Europe, I heard it in many places.
The hum is a low-frequency sound and vibration that comes through the air and ground. My first explanation was that all the machines we use combined generate this hum. This includes cars, trains, airplanes, factories, ventilation (ironically), underground pumps (whose sound carries far), farm machinery, etc.
Most people can’t hear it. I talked to a famous musician in Australia. She knew people worldwide who had heard it. She said it tends to occur in people who feel their internal conflict and disconnection acutely but cannot resolve or repair it yet. They still project responsibility for their suffering on the world at large. It’s not all in one’s head, but one is too vulnerable due to an error in attitude.
I had started to suspect something like this. She already had it nailed.
In Czech Republic, I visited a large music recording studio in the middle of Brno on a busy street. It was 8m x 14m inside with a 4m ceiling. The engineer let me lie on the floor in the dark for 10 minutes. I don’t recall if I was hearing the hum at that time. Their building technique was extremely effective in stopping the deafening noise outside.
They called it “house-in-house”. In America, “room within a room”. My brother had mentioned building a few music studios like this. The walls and ceilings of each structure don’t touch. The inner room’s floor “floats” on vibration-dampening springs or rubber blocks.
Then I visited an anechoic chamber at the Petrof Piano Factory in Hradec Kralove. It was extreme soundproofing! It was a 6m concrete cube, resting on leaf springs inside another building, with a 1m gap between the two.
To enter, I stepped over a gap, as in a subway, through a 120cm thick door. Foam cones 1m long protruded from the ceiling, walls, door, and floor. Suspended in the middle was a steel grill platform for a piano and engineer. With no measurable noise or echo inside, they could test a piano’s sound with extreme precision.
You have probably heard of these rooms. People claim to start going crazy in them. That is hype. The silence was heavenly. I could have stayed in there for a month.
The engineer was kind enough to give me 10 minutes. Sigh.
Anyway, the house-in-house technique is practical for silencing bedrooms for darkrooms. The gap between the houses must be at least 50- all around. The floating floor is 12–19- plywood on a frame, insulated and sheathed. Walls and ceiling are also insulated frames with drywall on both sides. Dual pane windows, airtight door seals, and silenced ventilation complete the construction.
machines
fan
Use an axial case fan, also known as a squirrel cage fan. Most common in desktop computers. Specifications:
- DC (direct current)
- 12V (volts) but run on as little as 6V, reducing speed, noise, and airflow
- 120–200- diameter
- 600–1200RPM (revolutions per minute)
- maximum 20dB (decibels)
- 65–200cmh (cubic meters per hour) or 40–120cfm (cubic feet per minute)
I recommend 200- fans. I redesigned the fan mount for them rather than the 120- fans I used for years. They move a lot of air and are very quiet. I have Cooler Master brand. Noctua makes the best, quietest fans available, running as low as 7dB. Maybe you could hear that if you’re a bat.
However, a common 120- fan is better than nothing. It usually requires a silencer. It is salvageable from a desktop computer power supply, $3 at thrift stores or flea markets, or $5–40 at a computer or electronics store. Avoid AC (alternating current) fans due to their penetrating hum (more on noise below).
Power it from the grid with an AC/DC adapter. 12V case fans run on as little as 6V. A universal adapter with pole switching and variable voltage (3–12V) for speed control is $5–10 at variety stores. Thrift stores have boxes of cheap adapters of fixed voltage if you know what voltage you want.
Off grid, use car or household batteries or a solar power system. To control speed, use a DC/DC car adapter from eBay. If you have no fan movement? Switch the +/– poles on the adapter or switch the positive and negative wires.
Blower fans are interesting. They overcome resistance in ducts and HRVs and move a ton of air. 120- units on eBay are $10–20. They need silencers and more powerful adapters. Larger slower quieter ones would be better. I built one once, about 500- dia x 100- thick. It was fun but it took a lot of time!
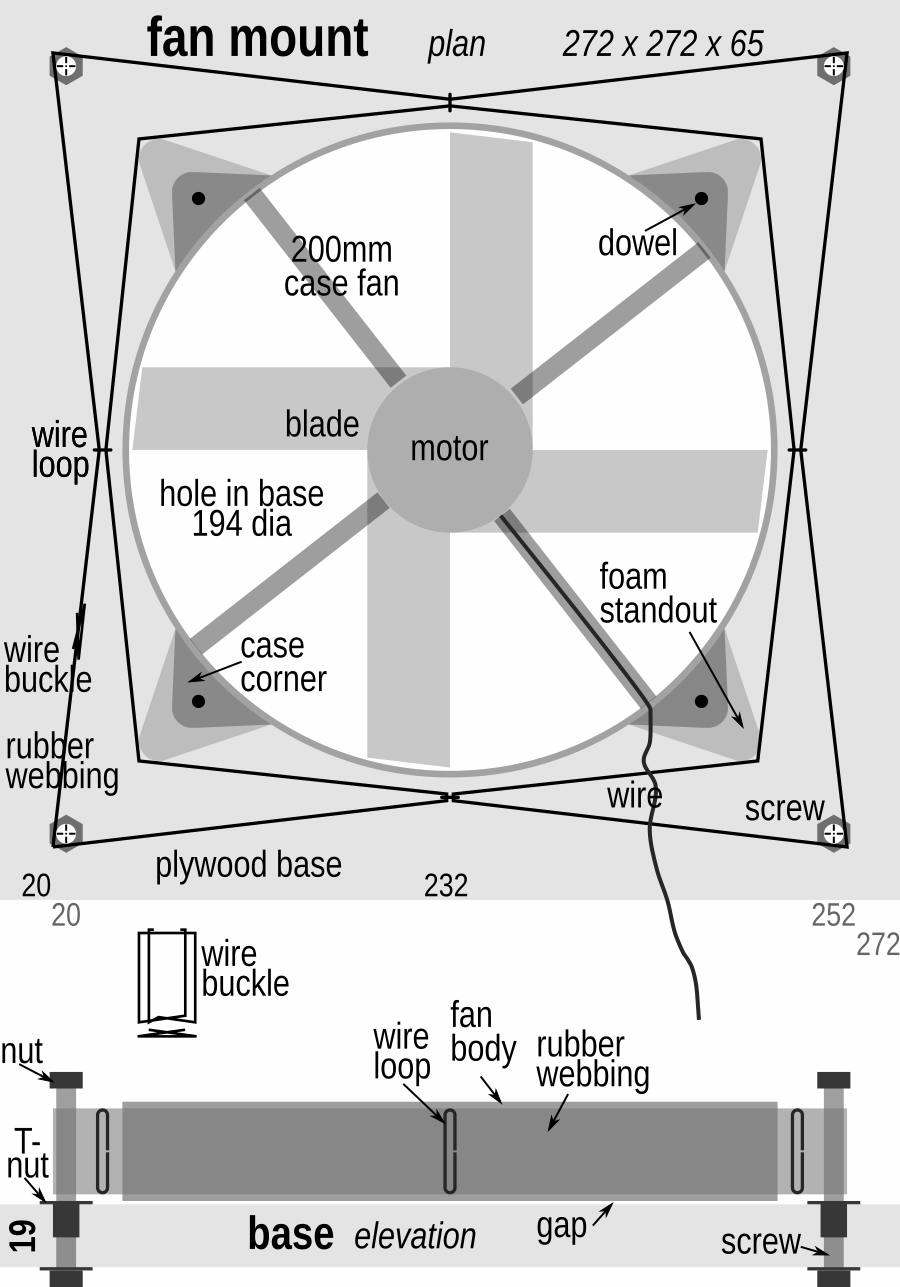
fan mount
The fan mount totally dampens vibration from the fan, already smooth and quiet. The silencer then absorbs airborne noise from the fan. It is inspired by studio microphones and tensegrity structures. It fits the silencer.
It is a fan suspended in a web of 2 concentric rings of rubber, stretched between 4 screw posts, anchored in a wooden base. It is modular, fitting silencer in any configuration.
- materials
- base: 272 x 272 x 19 (center hole, 194- diameter). Cut precisely with jig, band, or coping saw; router; or have a carpenter do it for you. Screw hole centers 20- from corners
- case fan: 200- (computer fan)
- screws: 4, 5 x 60 machine + 4 nuts + 4 T-nuts, 4 fender washers
- rubber: 28 x 1700 x 1–2. Use regular bicycle inner tube. Distances between loops and buckles vary with thickness of rubber. Tighten webbing enough to suspend fan without too much movement.
- loop: wire, 1-, bent to fit tight
- gap: 0.5–1- between base and fan
- assembly
- lay out rubber strip.
- figure out order to slide loops on. Do so.
- add buckle
- tighten and adjust rubber
- fit fan with foam standouts into rubber
- align fan directly over the hole in base. Gravity may pull it to one side or another. Tug on fan or webbing to reposition fan.
- slide webbing up or down screws to adjust base-fan gap
- screw base onto silencer over a hole in any position
plan: fan mount - download
power
In my first major darkroom in Guatemala, I had no electricity.
At first, to create a draft, I made lamps that burned cooking oil inside a lightproof chimney. It was a messy, unreliable, and labor-intensive process. No one should ever repeat it. But it worked long enough for my brain to make the leap to the 20th century and remember the existence of batteries.
AA batteries made a quick and dirty solution. One night requires 4–8 batteries, alkaline or rechargeable. Connect them in series: positive end of one to negative end of the next.
Voltage adds up like this. Each battery is 1.5V, so 4 batteries = 6V. Some fans need 7V or 9V to start, thus 5 or 6 batteries. Increase fan speed by adding batteries to the pack, up to 8. Increase pack life by using bigger batteries or another series in parallel (fan wires contacting ends of both series).
I was isolated and just learning. This simple discovery encouraged me after weeks of the fascinating absurdity of oil lamp-driven convective ventilation. However, changing batteries every day also quickly got to be a pain. So I bit the bullet and got a proper solar power system for less than $100:
- solar panel: 12V. Size depends on location: 10W in Guatemala, 40W in rainy Oregon winter. ($10–$100 on eBay)
- charge controller: 12V, 4 or 6-pole ($35 on eBay)
- battery: 12V 7A, lead acid ($30 at a motorcycle shop)
- wire, 20 AWG, enough to connect everything ($0–10 from your shed, a dumpster, yard sale, or hardware store).
Once built, maintain by wiping dust off panel once a week. What a luxury! Of course, if you have reliable wind or hydro power, that’s great, too.
warmth
For warmth, I often use a portable oil-filled electric heater. It is silent and can be positioned by a window or vent to warm incoming cold fresh air. Before buying, check that its indicator lights are easy to cover (not glowing from the interior through multiple cracks) and that it doesn’t rattle or hum. Old or cheap ones often make noise. Buy it new.
If you live in a cold place, I highly recommend buying and installing a Heat Recovery Ventilator (HRV) for both health and economy. It conducts heat from return air to supply air while keeping airstreams separate using an exchanging core and fans.
Fine wire heat exchange (fiwihex) technology is my favorite. It is 15x more efficient than plate exchangers. It is compact. A low power fan will supply air to one person. So it can be installed at point of use with little to no ducting. Fiwihex cores have been available for $150 from Viking House and possibly Fresh-R. These companies’ Breathing Windows embody an intriguing design for a complete ventilation system.
However, I lived with one for six months and found it too loud due to its small, high-RPM fans with no silencing. If fans were separated and silenced, fiwihex would be great. A 200- axial case fan works (I tried it). DC blower fans could work with silencing. Building your own HRV is doable.
It also needs a filter despite the manufacturers’ strange denials. Just a leg of a stocking inside a tube for each intake is enough. It’s much easier to remove, clean, and replace than using the core itself as a filter (the manufacturer’s strange instruction).
The most interesting plate exchangers use the Mitsubishi Lossnay core, found in ERVs (Energy Recovery Ventilators) such as Renewaire’s. Made of high-tech paper, the Lossnay recovers heat-trapping water vapor as well as heat from air.
Lossnay’s principle has DIY-potential, using non-siliconized parchment paper (“sandwich paper” in supermarkets). After 20 years of contemplation, I conceived a design for a convection-powered fiwihex ERV (solid state, silent). It would take a small factory to produce. Maybe someday I will.
purity
In some cases, an air purifier becomes necessary. Get one if your house is near a factory, busy roads, in a smoggy city, or near a smelly restaurant or neighbor. Purification methods include:
- activated carbon
- HEPA
- Photo Catalytic Oxidation (PCO) is a new, interesting technology that destroys pollutants at the molecular level. Several companies make filters with it. Prices vary widely.
- UV-C light bulbs with 253.7nm wavelength destroys VOCs and germs and cost less than $10. These would use the regular case fan and just need a universal vent to stop light.
Do not use an ionizer. It produces toxic levels of ozone.
Recently, I upgraded the ventilation system of a darkroom in Czech Republic where people burn coal for heat. Coal smoke smells terrible. I installed an activated carbon filter into the silencer. The $50, 180 x 180 filter eliminated the smell. Catching the particles would require HEPA filtration, but it was less important at the time.
The filter also stops all light and some sound. It requires a fan more powerful than a case fan to overcome the resistance it presents. A blower fan does this. I have yet to test one with a silencer. If that works, I’ll adapt the fan mount for one.
If air quality at your home is bad enough, consider moving. Lots of places in small towns and the countryside have clean air and are less polluted in general. It is a cheap and simple solution to multiple problems, some of which you may not know you have yet.
~/~
That’s it for lightproof ventilation, silence, power, heating, and purification. On to darkening doors and windows.